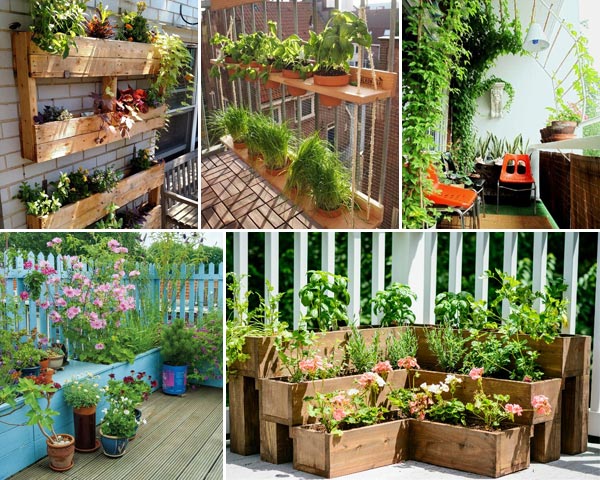
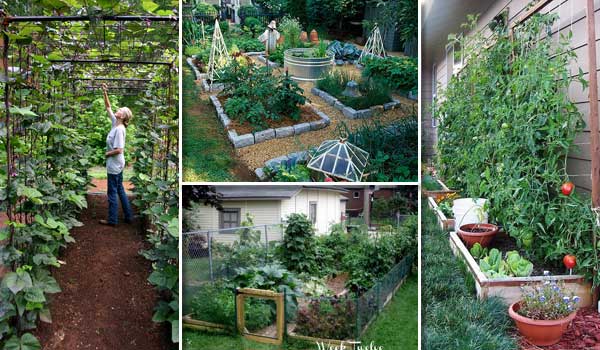
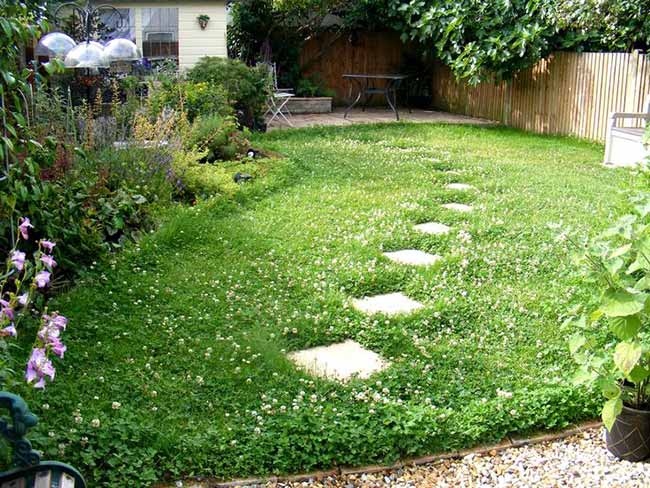
17 Key Factors to Consider Before Planting a Clover Lawn
Tired of battling brown patches, endless watering, and high-maintenance turf? There’s a smarter way to keep your yard lush and vibrant all summer long—without the hassle. Enter the clover lawn, a game-changing alternative that thrives with minimal effort, stays green in scorching heat, and even supports essential pollinators like bees and butterflies.
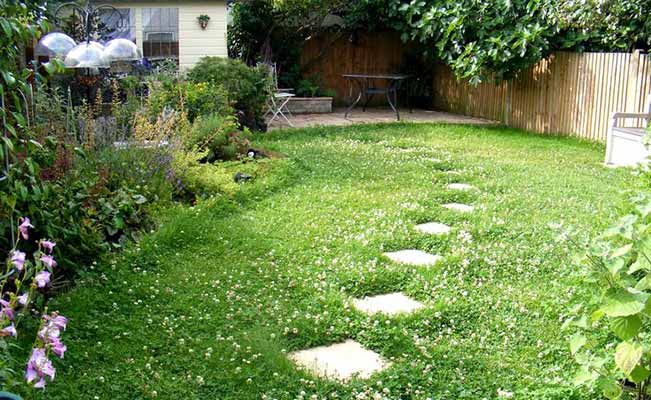
Once dismissed as a mere “weed,” clover is making a triumphant return as an eco-friendly, low-maintenance ground cover. It not only fills in gaps for a denser, healthier lawn but also naturally enriches the soil by fixing nitrogen—reducing your need for synthetic fertilizers. Better yet, you don’t have to start from scratch; clover blends beautifully with existing grass for enhanced resilience and coverage.
In this guide, we’ll break down the key differences between traditional grass and clover, weigh the pros and cons, and introduce you to some of the best clover varieties. Plus, we’ll walk you through the steps to transform your yard into a lush, clover-filled oasis. Ready to rethink your lawn? Let’s dive in.
What Is a Clover Lawn:
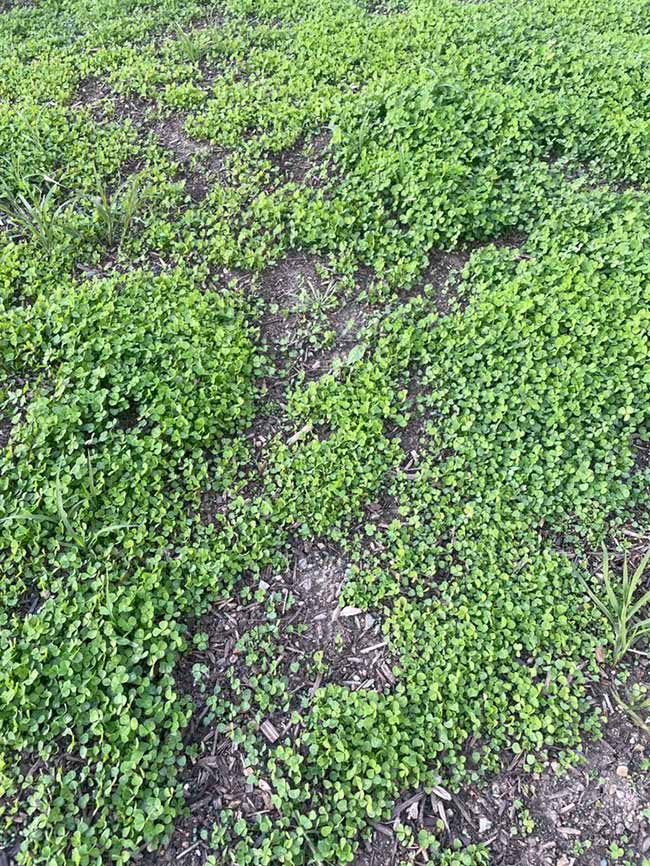
Unlike traditional lawns filled with turfgrass, a clover lawn is made up entirely (or partially) of clover—an easy-growing, eco-friendly plant that belongs to the same family as peas and beans.
This resilient perennial naturally enriches the soil and requires far less upkeep than conventional grass.
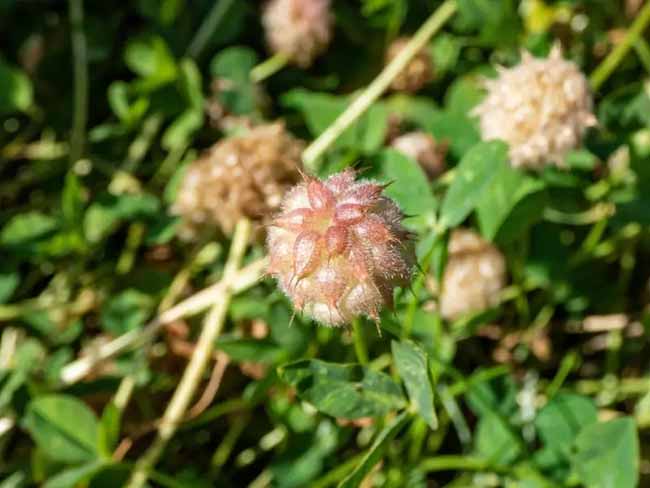
The three most common clover varieties for lawns are white clover (Trifolium repens), red clover (Trifolium pratense), and strawberry clover (Trifolium fragiferum).
Among them, white clover is the top choice, thanks to its durability and adaptability in USDA Zones 3-10. All clover types thrive in cool seasons, spreading over a foot wide to create a dense, lush ground cover.
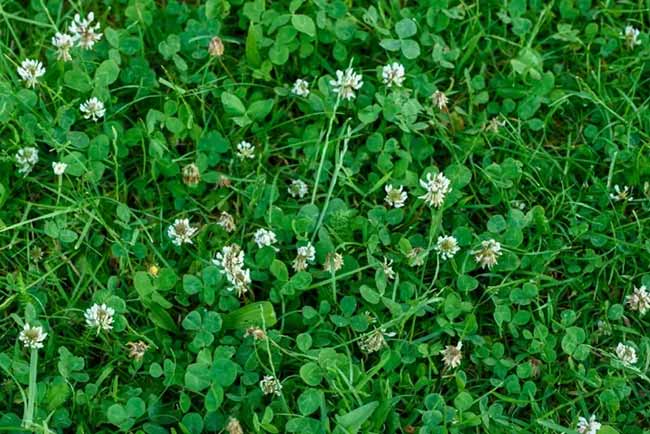
You can go all-in with a full clover lawn or mix it with traditional turfgrass like tall fescue or Kentucky bluegrass for a healthier, low-maintenance yard. Either way, clover offers a fresh, hassle-free alternative to high-maintenance grass.
Things to Consider Before Choosing a Clover Lawn:
Starting a new lawn—whether from scratch or by overseeding—takes time, effort, and patience. Since establishing a lawn is a commitment, it’s worth considering your options carefully.
Before making the switch to clover, take a moment to think about whether it aligns with your lawn goals and maintenance preferences.
PROs:
Why Clover Lawns Are a Smart Choice?
Switching to a clover lawn comes with several practical benefits, from reducing maintenance to improving soil health. Here’s why clover is a game-changer for your yard:
-
Naturally Enriches the Soil
Clover acts as a natural fertilizer by pulling nitrogen from the air and returning it to the soil. When mixed with grass, this helps seedlings grow stronger without the need for chemical fertilizers. It’s also why clover is commonly used as a cover crop and green mulch. Leaving mowed clover clippings on the lawn or adding them to garden beds further boosts soil quality. -
Minimal Mowing Required
Unlike traditional grass, clover stays short—typically between 2 to 8 inches—so frequent mowing isn’t necessary. In fact, you may only need to mow once or twice a season, or not at all. This makes clover especially useful for slopes and areas where mowing is difficult. -
Thrives with Little Water
Once established, clover has deep roots that access moisture far below the surface, making it highly drought-resistant. Other than occasional watering during the initial growth phase, it generally doesn’t need irrigation. -
No Need for Herbicides or Pesticides
Clover spreads quickly and naturally suppresses weeds, eliminating the need for herbicides. It’s also resistant to common lawn pests like grubs, so pesticides aren’t required either. -
Fertilizer-Free Growth
Clover improves soil quality on its own, reducing the need for synthetic fertilizers. It grows well even in poor, sandy, or compacted soil. If mixed with grass, it keeps the lawn greener and healthier without extra feeding. -
Grows in a Variety of Soils
Unlike turfgrass, which struggles in nutrient-poor conditions, clover thrives in less-than-ideal soils. Its deep taproot helps it absorb nutrients and moisture from below the surface, allowing it to grow where grass won’t. -
Supports Pollinators
Flowering clover attracts bees and butterflies, providing essential food for these crucial pollinators. With pollinator populations declining due to habitat loss and pesticide use, a clover lawn can help support biodiversity. -
Durable When Combined with Grass
While clover alone isn’t as tough as turfgrass for high foot traffic, blending the two creates a more resilient, walkable lawn that can handle regular use. -
Pet-Friendly & Resistant to Urine Spots
Unlike traditional grass, clover doesn’t develop brown patches from dog urine, keeping your lawn looking fresh. However, it’s also a favorite snack for rabbits, squirrels, and deer, so expect some wildlife visitors.
By choosing clover, you’ll enjoy a lush, low-maintenance, and environmentally friendly lawn that benefits both your yard and local ecosystems.
CONs:
Potential Drawbacks of a Clover Lawn
While clover lawns have plenty of advantages, they’re not the perfect fit for everyone. However, most downsides can be managed with proper planning. Here’s what to keep in mind before making the switch.
1. Less Durable for Heavy Foot Traffic
Clover isn’t as tough as traditional turfgrass when it comes to handling frequent foot traffic.
If you have pets, active kids, or frequently use your lawn for outdoor gatherings, clover alone might wear down faster in high-traffic areas.
A practical solution is mixing clover with a hardy grass variety, such as fine fescue, to create a lawn that’s both resilient and low-maintenance.
2. Potential for Bee Stings
Clover attracts pollinators, which is great for the environment but can be a concern if you or your children often walk barefoot.
Bees are naturally non-aggressive, but stepping on them while they’re foraging can lead to an accidental sting.
If this is a concern, consider mowing before clover flowers bloom or choosing micro-clover varieties that produce fewer blossoms.
3. Can Spread Beyond Intended Areas
Clover is a vigorous grower, and while it doesn’t spread as aggressively as some invasive plants, it can creep into garden beds or unwanted areas if left unchecked.
If you want to keep your clover contained, occasional edging or installing garden borders can help prevent it from spreading too far.
4. Might Need Occasional Reseeding
Unlike traditional turfgrass that grows back year after year, clover is a short-lived perennial, meaning some areas may thin out over time.
However, since clover naturally reseeds itself, this isn’t always a major issue. If needed, a light overseeding every couple of years can help maintain a full, lush lawn.
5. Doesn’t Stay Green Year-Round
Clover thrives in cool seasons but may turn brown or go dormant during extreme heat or drought.
While it requires far less water than traditional grass, it might not look as vibrant in mid-summer unless paired with a drought-resistant grass variety.
Final Thoughts
Clover lawns may not be as foot-traffic friendly as turfgrass, but their eco-friendly benefits, low maintenance, and natural resilience make them an excellent choice for many homeowners.
With a little planning—such as mixing clover with grass, mowing strategically, or keeping growth in check—you can enjoy a lush, sustainable lawn that works for both you and the environment.
++++++++++++++++++++++++++++++++++++++++++++++++++++++++++++++
Best Types of Clover for Your Lawn:
When selecting clover for your lawn, it can feel overwhelming given the sheer number of clover species—over 300!
But don’t stress, we’re here to simplify the process by highlighting five of the best clover varieties that not only enhance your lawn’s beauty but also bring practical benefits, making them an excellent choice for homeowners seeking a low-maintenance, eco-friendly alternative to traditional grass.
1. Crimson Clover (Trifolium Incarnatum)

Crimson clover is a standout option known for its striking crimson-colored flowers, which are pea-shaped with long heads.
It can grow up to 3 feet tall, making it an eye-catching addition to your lawn or garden. Beyond aesthetics, crimson clover is a powerhouse when it comes to soil health.
It is a nitrogen fixer, meaning it naturally adds nitrogen back into the soil, helping to enrich and nourish your lawn.
This variety is especially useful for areas prone to erosion, as it creates a dense mat that helps hold the soil in place. Crimson clover thrives in USDA hardiness zones 6–10, making it perfect for mild to moderate climates.
Best For: Soil enrichment, erosion control, and aesthetic appeal in large or open lawns.
2. Strawberry Clover (Trifolium Fragiferum)
If you’re looking for a low-growing clover that thrives in challenging soil conditions, strawberry clover might be the perfect choice.
Growing up to 14 inches tall, strawberry clover is known for its small, red flowers that resemble strawberries, adding a unique touch to your lawn.
This variety is ideal for alkaline and wet saline soils, making it perfect for areas that may be too tough for other plants to grow.
Additionally, strawberry clover has an impressive ability to tolerate shade, making it a fantastic option for areas in your lawn that don’t get much sunlight. Strawberry clover does well in USDA zones 4–8.
Best For: Shaded areas, wet soils, and adding a pop of color to your lawn.
3. Red Clover (Trifolium Pratense)
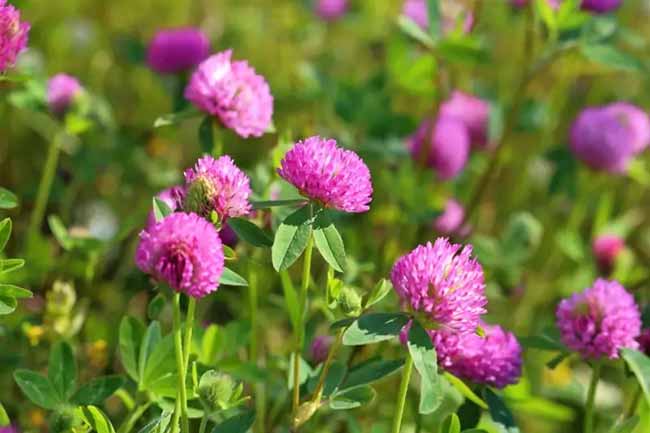
Red clover is a versatile and nutrient-rich variety that stands out with its vibrant reddish-purple flowers.
This clover can grow up to 24 inches tall, adding height and texture to your lawn.
It is rich in essential nutrients like calcium, niacin, potassium, and vitamin C, and is often used in natural health remedies.
While not commonly used as a primary lawn cover, red clover is excellent as a nitrogen-fixing cover crop, especially for poor soils.
It’s an excellent choice for areas that need a boost in nutrients and soil health. Plant red clover in USDA zones 4–8 for optimal growth.
Best For: Restoring soil health in nutrient-deficient areas and improving the overall quality of your lawn.
4. White Clover (Trifolium Repens)
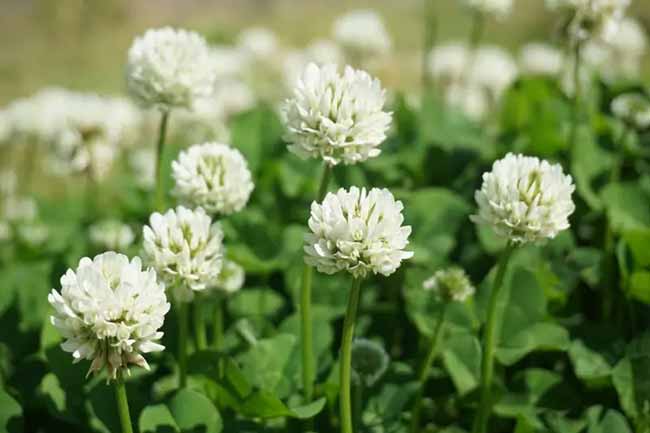
White clover is the most widely recognized and commonly used clover variety in the U.S.
It’s a low-growing clover that produces delicate white flowers, making it a visually appealing addition to your yard.
White clover is also highly efficient at spreading quickly and thriving in poor soil, making it ideal for low-maintenance lawns.
One of its most significant benefits is its ability to naturally suppress weeds, as it forms a dense mat that crowds out unwanted plants.
White clover is hardy in USDA zones 3–10, making it adaptable to various climates and growing conditions.
Best For: Low-maintenance lawns, natural weed control, and improving soil quality without chemicals.
5. Microclover (Trifolium Repens var. Pirouette and Pipolina)
Microclover is a newer, refined variety of white clover, offering many of the same benefits but with some added advantages.
This clover has smaller leaves and fewer flowers than standard white clover, giving it a more subtle, delicate appearance.
It grows lower to the ground, typically between 4–6 inches tall, and forms a dense, lush cover that resists clumping, providing a smoother and more uniform lawn.
Microclover is particularly valued for its high tolerance to foot traffic, making it an excellent option for lawns with kids, pets, or heavy use.
It thrives in USDA zones 4–8 and pairs well with other grasses for a blended look.
Best For: High-traffic areas, low-growing lawns, and homeowners looking for a cleaner, denser clover variety.
Which Clover to Choose?
- For Erosion Control and Soil Enrichment: Crimson Clover is perfect if you need a clover that can enrich the soil while preventing erosion.
- For Shady or Wet Areas: Strawberry Clover thrives in shaded or damp spots and will add a unique color to your lawn.
- For Improving Nutrient-Poor Soil: Red Clover is ideal for soils lacking in essential nutrients and can help boost soil health.
- For Low-Maintenance, Weed-Free Lawns: White Clover offers easy care, weed suppression, and excellent soil quality.
- For High-Traffic and Low-Growth Needs: Microclover is your go-to option for a durable, dense, and low-maintenance lawn.
Final Thoughts
Choosing the right clover variety depends on your lawn’s needs and the conditions in your yard.
Whether you want to improve soil quality, add color, or reduce maintenance, there’s a clover variety that’s perfect for you.
By selecting the best type of clover for your region and needs, you can enjoy a lush, healthy, and eco-friendly lawn that requires less water, fewer chemicals, and minimal maintenance.
++++++++++++++++++++++++++++++++++++++++++++++++++++++++++++

How to Plant a Clover Lawn:
Planting a clover lawn is a simple, rewarding process that can transform your yard into a lush, low-maintenance, and eco-friendly space.
To get the best results, it’s important to know the right steps to follow. Start in early spring (mid-March to mid-April) to give the clover seeds plenty of time to establish before the cooler weather sets in.
Follow these easy steps for planting a thriving clover lawn:
1. Prepare the Lawn Area
Before you begin, decide if you want an all-clover lawn or a mixed lawn with clover and grass.
If you’re aiming for a pure clover lawn, you’ll need to remove any existing grass and weeds.
This will ensure that the clover has no competition for space and resources.
For a mixed lawn, simply seed the clover on top of your existing grass and let it grow together.
If you choose to remove grass, you can do this by using a shovel or a garden hoe to dig it out, or by using a non-toxic herbicide.
2. Prepare the Soil
Once the area is clear, rake or lightly scratch the surface of the soil.
The goal is to create a loose, rough texture that allows the clover seeds to make good contact with the soil.
This step is important because it gives the tiny clover seeds a better chance to germinate and establish their roots.
3. Sow the Clover Seeds
Clover seeds are small, so sowing them evenly can be tricky. Aim to distribute 6 to 8 ounces of seed per 1,000 square feet.
This ensures that your clover will grow densely without being overcrowded. Some clover seeds come coated or pelleted, which makes them easier to handle.
For larger lawns, a broadcast seeder can help spread the seeds more evenly and quickly.
Make sure not to plant the seeds any deeper than ¼ inch, as clover prefers to be sown on or near the soil surface.
4. Water the Seeds
After sowing, water the area lightly. You don’t need to soak the ground—just enough to keep the seeds moist as they begin to germinate.
Once the seeds are planted, water them regularly, especially if the weather is dry.
Keep the soil moist, but not soggy, for the first few weeks to encourage healthy growth.
Once the clover is well-established, it will need much less water than traditional grass.
5. Avoid Fertilizing
Clover is a nitrogen-fixing plant, meaning it naturally adds nitrogen back into the soil as it grows.
This makes it unnecessary to fertilize your clover lawn.
In fact, applying fertilizer could harm the clover by encouraging unwanted weed growth or encouraging grass, which competes with the clover. So, skip the fertilizer and let nature do its job.
Final Tips for Success:
Choose the Right Variety: Make sure you’re planting the best type of clover for your climate and soil type (check the earlier section for recommendations).
Patience is Key: Clover takes time to establish itself, so be patient. It may take a few weeks to a couple of months for it to fully grow in.
Keep It Weed-Free: Especially in the early stages, keep an eye out for weeds that might try to take over. Gently remove them by hand to give your clover the best chance to thrive.
By following these simple steps, you’ll be on your way to a beautiful, sustainable clover lawn that requires less water, fewer chemicals, and minimal maintenance—plus, it’s great for the environment!
++++++++++++++++++++++++++++++++++++++++++++++++++++++++++++++++
How to Mix Clover with Turf Grass:
If you’re not quite ready to commit to an entirely clover-filled lawn but want to enjoy its benefits, mixing clover with your existing turfgrass can be a great option.
One of the best clover varieties for this purpose is Microclover.
It’s particularly well-suited for integration because it can handle frequent mowing and will blend seamlessly with your turfgrass, offering a more uniform appearance.
To mix clover with your current grass, reseed your lawn in the fall using clover seed instead of grass seed.
This method will allow the clover to naturally spread and complement your existing grass.
As the clover establishes itself, it will add nitrogen to the soil, effectively feeding your grass.
This can reduce or eliminate the need for traditional fertilizers, promoting a healthier, more sustainable lawn.
By combining clover with turf, you get the best of both worlds: the beauty and durability of grass, along with the eco-friendly benefits and low-maintenance nature of clover.
++++++++++++++++++++++++++++++++++++++++++++++++++++++++++++++
How to Care for a Clover Lawn:
Once established, clover lawns are incredibly low-maintenance, but proper care during the growing season will ensure they remain healthy and vibrant. Here are some important tips to keep in mind:
Sunlight
Clover thrives in full to partial sun, making it perfect for most lawns. It does well in bright, sunny spots, but it can also tolerate some shade.
For optimal growth, aim to plant it in an area where it will get at least 4 hours of sunlight a day, although it will still perform reasonably well in shadier spots.
Watering
Clover needs regular watering until it gets established, typically within the first few months after planting.
Once established, it is much more drought-tolerant than grass and will only need to be watered once or twice a week during dry spells.
Clover’s deep roots help it draw moisture from deeper in the soil, so even in periods without rain, it can generally survive with minimal watering.
Soil
One of clover’s standout features is its adaptability to different soil conditions.
It can grow in a wide range of soils, from sandy to clay-heavy or even compacted soil.
This makes it an ideal choice for lawns with poor drainage or low-quality soil.
Clover’s deep roots also help to aerate the soil, making it better for other plants and improving the overall health of your yard.
Mowing
Clover is incredibly low-maintenance when it comes to mowing.
Typically, it will only need to be mowed three to four times per year, depending on your personal preference.
Some homeowners prefer to mow their clover lawn more frequently to maintain a neat, tidy appearance before the clover begins to bloom.
If you prefer a more natural, “wildflower” look, you can let your clover grow up to its maximum height of 8 inches, adding a softer, more lush feel to your landscape.
Clover is also great for providing pollinator-friendly blooms, especially during spring and early summer.
If you enjoy the visual appeal of flowers and the benefits of supporting pollinators like bees and butterflies, letting the clover bloom before mowing can be an excellent choice.
++++++++++++++++++++++++++++++++++++++++++++++++++++++++++++++
The following case comes from one of our loyal fans, who provided a detailed process of planting a clover lawn:
What to Plant – Plenty of Options!
When choosing clover for your lawn, there are many options, including annual varieties. For a lasting, perennial lawn, opt for clover that will return year after year, just like grass.
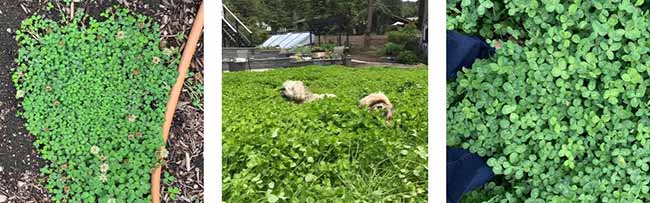
Dutch White Clover
My Choice: This is the variety I planted (although I may have overplanted a bit, haha). It’s affordable—about $5 per cup from Buckerfields.
Growth: Dutch White Clover spreads easily and grows 3–4 inches high, but it can get taller if it competes for light in a meadow-like setting.
Flowers: The flowers are great for feeding bees.
Hardiness: Hardy to Zone 4.
Micro Clover
Cost: A bit more expensive, roughly $35 per cup.
Growth: Micro Clover only grows 2–4 inches tall, making it perfect for those who prefer a lower-growing lawn.
Flowers: It has fewer flowers, so it’s a better option for people with bee allergies.
Fun Clovers
Blended Varieties: West Coast Seeds offers blends that mix clover, flowers, and grasses, such as Bee Turf and Easy Care Envirolawn. I mixed these into my lawn, though my overzealous seeding of clover meant the flowers didn’t get much of a chance to grow.
When to Plant
Clover requires consistent moisture to germinate, so spring is the best time to plant, though fall can work too. Here’s what I wish I’d done last fall:
Prepare the Soil: Cover your lawn or weedy patches for the winter. For small areas, I use cardboard, and for larger areas, construction wrap works well. This will kill off some weeds, but the tough ones will persist. Grass can also act like a weed, and even under plastic or cardboard, it may not die fully, but that’s okay!
Weed Control: For weeds with long taproots, I use a root-pulling tool. For heavier soil, ensure it’s moist deep down—ideally after a few days of rain followed by a dry day. While you won’t get all of the taproot, it will significantly slow the weed growth.
Other Weeds: For smaller weeds, I simply chop them down and leave them. If they’re prickly, though, I bin them.
Covering: Layer plastic in thirds and weigh it down with rocks or other materials. Leave it in place over the winter to suppress the weeds effectively.
How to Plan
Clover doesn’t need any additional soil amendments—it naturally enriches the soil with nutrients.
- Level the Area: If you want a smooth, even lawn, leveling the ground is helpful.
- Loosen Compacted Soil: If your soil is compacted, take the time to loosen it up. In one of my areas, we removed the weeds, and that patch grew so much better than the compacted section. The loosened soil is healthier and doesn’t wilt in the heat, while the compacted soil struggles, especially on hot days.
My Process:
- Remove Sod and Weeds: My first task was to peel back the sod and pull out the weeds. If you have bare spots, you can seed them with clover, but keep in mind that clover won’t grow through thick thatch.
- Leave Some Grass Roots: Even though I removed the sod, I left behind any grass roots or tufts. The combination of grass and clover is much stronger together, and I’ve noticed the grass growing quietly under the clover’s shade.
- Sow the Seeds: Sprinkle clover seeds directly onto the loosened soil. Because the seeds are tiny, they can dry out quickly, so be sure to keep the soil damp.
- Water Regularly: I planted during a surprise heatwave, so I used a sprinkler on a timer to water for a few minutes, four times a day—just enough to keep the soil moist without oversaturating it. As the clover grew, I reduced watering until the sprinkler was no longer needed.
To mark where I wanted the clover to stop, I laid down a hose. This helped keep the soil underneath moist, so the clover naturally grew in that area first.